Welcome - Explore my Blog

I've been keeping this blog for all of my beekeeping years and I am beginning my 19th year of beekeeping in April 2024. Now there are more than 1300 posts on this blog. Please use the search bar below to search the blog for other posts on a subject in which you are interested. You can also click on the "label" at the end of a post and all posts with that label will show up. At the very bottom of this page is a list of all the labels I've used.

Even if you find one post on the subject, I've posted a lot on basic beekeeping skills like installing bees, harvesting honey, inspecting the hive, etc. so be sure to search for more once you've found a topic of interest to you. And watch the useful videos and slide shows on the sidebar. All of them have captions. Please share posts of interest via Facebook, Pinterest, etc.

I began this blog to chronicle my beekeeping experiences. I have read lots of beekeeping books, but nothing takes the place of either hands-on experience with an experienced beekeeper or good pictures of the process. I want people to have a clearer picture of what to expect in their beekeeping so I post pictures and write about my beekeeping saga here.Master Beekeeper Enjoy with me as I learn and grow as a beekeeper.

Need help with an Atlanta area swarm? Visit Found a Swarm? Call a Beekeeper. ‪(404) 482-1848‬

Want to Pin this post?

Monday, July 20, 2015

New Take on the Solar Wax Melter - Trying Something Different

I've got a lot of wax to melt and have been feeling a little frustrated with the solar wax melter method I am currently using. I hate wasting all of those paper towels and you can only do a little at a time with the Tupperware, the paper towel, the rubberband, etc.

So wandering around Youtube, I found another solar wax melter, fancier than my version below, but based on the same idea. I quickly went past the video and haven't been able to find it again, but thanks to whoever provided this idea.

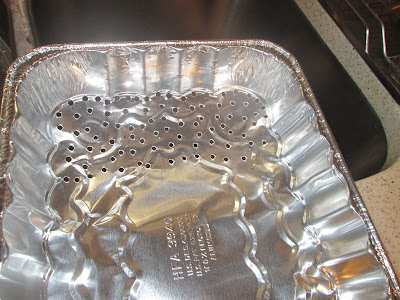
I went to the grocery store and bought aluminum 8X10 cake pans with about 2 inch sides. I took the handy awl I have in my toolkit - don't ask - it's the influence of my father in my childhood and his ideas of what one should have in a tool box. I may have never used it before. I used it to punch holes in the bottom of one end of the cake pan.


I also bought some plastic rectangular boxes and filled the boxes about one inch or so deep with water. I took my reliable on stand-by styrofoam beer coolers and placed a plastic water-filled box in each of them. The box was too large to go all the way down to the bottom but was large enough that it supported itself against the walls of the styrofoam cooler.

Then I put the aluminum pans at a slant in the cooler above the water filled plastic box. I made sure the end with the awl-punched holes was on the lower end of the slant.

I filled the aluminum pans with dry wax particles.


Then I covered the cooler with its pane of glass cover and left them to sit in the sun. Oh, and I lifted the high end up a little with an empty frame as support.


At the end of the day, the wax had melted and gone through the holes to float on the water below; the slum gum was all black and yucky, and I had lost no wax to a paper towel.


I have been using this for about a week now and have melted a lot of wax. Here's what I have gotten from my efforts so far.


Advantages of this melter:

1. Larger quantities of wax can be processed at a time.
2. No loss of wax to the paper towel filter.
3. The wax is quite clean and shows no need for a filter - all the slum gum stays in the aluminum pan. The water works beautifully as it did in my old melter for providing a surface on which the wax can float.
4. The wax is often in small bits from dripping through the holes - this will be easier to measure for soap and lip balm than having to melt the huge wax block before measuring (that's what's in the small plastic bags in the bucket - small bits of wax)

Disadvantages of this melter:

1. I believe the aluminum pans will have to be replaced after ten or twelve runs
2. At the end of the day, when the sun is no longer beating down, the slum gum hardens to the bottom of the aluminum pan. I've had to put the slum gum pans in the melter for a couple of hours the next day and then wipe them out with paper towels before they are available to use again.
3. The above task requires a pot holder because the pan is so hot and it's nasty to wipe out the slum gum...yuck.
4. Costs from scratch about $15 - $18 to make because the aluminum pans were not cheap...$6 for the styrofoam cooler, $5 for the aluminum pans, cost of glass pane will vary. The other solar wax melter cost about $10 total but melts much less wax and is more bother.



Thursday, July 09, 2015

Growing a Greener World

Last year I spent a good bit of time driving up and back to Milton, Georgia, home of Joe Lamp'l, the producer and star of Growing a Greener World. The irony is that Joe's wonderful show is seen on PBS in almost all the states except Georgia and Alaska, but Joe lives here in Georgia on a beautiful organic farm north of Atlanta.

His sixth season started with the episode that I helped him with on becoming a beekeeper.

Here's a link to the episode.

He visited my beeyard earlier in the year.  That resulted in a small piece of another beekeeping show he did.

We had quite an adventure through the year and I was so honored to be asked to be a part of Joe's good work in the organic gardening that he does and the influence that he has.

Tuesday, July 07, 2015

Rabun County Bee Status Report

Since I am up here for the Fourth of July holiday, I went over to check on the bees at Robin's house. The sourwood is blooming up here.  It started early this year and is about in the middle of its bloom.  I fully expected the bees to be bringing in tons of nectar.

We are not planning to harvest from this hive this year. Starting so late, our best hope is that the bees can collect enough honey to make it through the winter.

There were plenty of bees coming in and out of the hive, but also asparagus greenery in front of the hive so it's hard to see any bees in this photo - trust me, they were there!


The first thing I did was to kill a black widow spider who had built her web and laid eggs inside the top cover.  I frequently have found black widows in the inside of the top cover - this is at least the fifth one in the last two years. (You can't see her in the photo but can see the remnants of her web.

Upon opening the hive, I found beautiful straight comb and the bees were making good use of what they had. In this comb they were storing nectar:


In these two shots the honeycomb is full of eggs - just look at how active this good queen is!


Since I live over 100 miles from this hive, I decided to leave them with a fourth box even though they had barely started using the third box. It is the height of the sourwood flow and if they don't use the box for nectar, it will help with ventilation. I did not put a ladder frame into the hive because there wasn't one available in the box below, so we'll just hope for the best.

Truly my car was not parked on top of the hive, but it does look rather strange!  I'll be back in a few weeks to check on this hive and probably to steal one frame of sourwood honey!

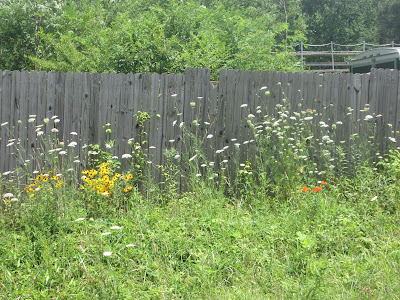
As I drove back to the mountain house, I was struck by the beauty of the roadside blooming weeds that serve the bees so well in the country.  There was an abundance of Queen Anne's lace, bright orange butterfly weed (a member of the milkweed family which bees love), and black-eyed Susans.


Aren't they lovely? The sad thing for bees today is that when you aren't in the country as I am now, the sides of the road are not full of flowering weeds. 


Pin this post

LinkWithin

Related Posts Plugin for WordPress, Blogger...